Tuesday, 13 March 2012

Morpher

Morpher allows us to animate an object by "morphing" clones of the object. To begin with we imported a human head object made by Richard.
We then created several clones of the head in order to create the different expressions using the morpher editor.
Using the Editable Poly function we editing the three clones; the first had an open mouth, the second had its eyes closed and the third had raised eye brows. Each of these where achieved by selecting the appropriate Polys and moving them to gain the intended output.

Then we applied the Morpher modifier to the orginal object and then selected the three expressions in the channels tab. This allowed up to select a point between 0% and 100% of the morph, which allowed the us to create various expressions and then created a small animation using them. 

To finish it off I applied a Turbo Smooth to the model.


Thursday, 1 March 2012

Viana's First Wall

In my Animation i will be showing the battle at Viana Castle if Da Vinci Machines had been manufactured. So i created the first defensive wall which will be destroyed by Da Vinci's Tank.

Tuesday, 28 February 2012

Animation In 3DS Max

Animation in 3DS Max is much easier than i thought it would be. We began by using the Autokey and Set Key functions to animate shapes, this works in a similar why to flash by creating key frames and moving the object to a different position in each frame. The outcome is then similar to that of a Motion tween.
Secondly we learnt how to use the curve editor. To begin with we created a simple animation of a ball going up and then back down. After opening the Curve Editor this showed a graph which we could use to edit the animation making the ball bounce faster and slow down as it hit the peak of its bounce.
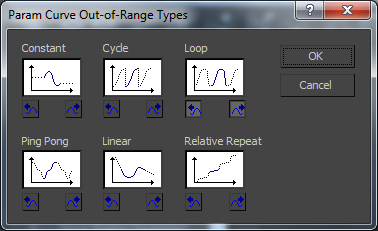
To make the animation continue throughout the timeline we Click on "Parameter Curve Out-Of-Range Types" and selected Loop. This then looped the animation for the length of the timeline.
Finally we copied the ball and learnt how to use the "Dope Sheet". This allowed us to affect when each ball would start to bounce and the speed of the bounce. This was achieved by sliding and change the length of the bars.

Tuesday, 21 February 2012

Making a start on the Flying Machine

I managed to make a start on the flying machine today. By using the Arc tool I was capable of making the skeleton frame of the wings.

Tank Editing

Today I changed the size of the cannons for the tank to make them more realistic to the size of the tank itself. I also added some wheels to the base to allow the tank to move.

Cannons:


Wheels:


Da Vinci Mood Boards


Tuesday, 14 February 2012

Lighting

Today we learnt how to use Lighting in 3DS Max. The First light we used was a Omni Light, which gives off light in all directions similar to a naked light bulb. We then turned on the shadows features and edited the intensity to make them sharper and smoother.
We then added and second Omni Light and Excluded a object from the light. The teapot is the example below:
We then learnt how to use the Target Spot lighting effect. To Begin we imported a pumpkin model created by Richard. We added a Omni Light inside the pumpkin, changed the colour of the light to orange to simulate a candle and turned on the Shadow effect.
We then added a Target Spot light above the Pumpkin and angled it down onto the pumpkin. We changed the colour of the light to green and then opened the Environment effects menu. In here we changed the Density of the Fog effect to create a "Spooky" Lighting effect.